So I've been spending a lot (I mean, a lot) of time creating families, and have discovered some nasty little secrets...
- I always knew that you couldn't use fill regions in a model - that they had to be in a detail component family. And most ceiling mounted, hosted families work fine with a combination of 2D families to be the plan representation.
What I've struggled with are the wall mount families. Since the "wall" is actually a flat plane, and a nested 2D family can only be placed on the flat XY planes, I'm having issues getting the 2D representation to work right. Some of our symbols require fill (which I'm not keen to using linework instead of a region), so using symbol lines can be used in some cases but not in others (i.e. I need fill).
And it's really inconsistent. The duplex receptacle families seem to work fine, so I applied the same logic - but didn't get the same results with a light family.
So my answer for now is not to use a hosted family for a wall mounted (or vertical face) family. The non-hosted element works fine, and it can still be alignment or dimensionally constrained.
- Why don't the family templates include all identity data - i.e. where's the label or type mark parameter? And if I add these, they still don't pick up the data. Once the family is in a project, you can add/edit this fine, but we really need to be able to define this in the .RFA file.
- Had a great sustainable design session with a couple of guys from Autodesk today - a couple of items I got out of it - our engineers need to understand that the world is changing, and that the families in Revit can include data such as the U-Value, R-Value, etc. - and that's OK. When we get to a point where the wall/opening/enclosure elements can transfer this data either directly out to gbXML, or better yet, have the space recognize the wall type/window type/etc. (re: AutoCAD Architecture) and work through linked files, then we can start providing even more data to the engineer in an electronic form. I understand where the engineer is coming from as well - traditionally, we'd rather control that information and offer the options back to the architect, but in this new BIM paradigm it's all about the interoperability of data between platforms. I can't wait for the day that data can be edited/transferred between linked files...and the future for better energy modeling is brighter than ever. Now - if someone can just produce some decent written documentation on Green Building Studio and Ecotect (and IES, too)...
Christmas is just a few days away - get your shopping done soon!
Later - David B.
Tuesday, December 21, 2010
Thursday, December 16, 2010
A little side story...my trip to the Camo Mecca...
Doing a little work at the home office in Camp Hill, PA, and having a great week...so I decided while I was here, I needed to make a trip to the nearest Cabela's - if you're not familiar with the store, it's the outdoors mecca for hunters and fisherman - which I do poorly but still love to do. It became an amazing quest, so let's take the journey.
Wrapped up my last meeting at 3:00pm, got some directions and headed out - to discover a little snow blowing...beautiful, just before Christmas. Being the good southerner, I'm inclined to drive in the snow in my 4WD pickup, but this week, we're in the company "clown" car...tiny but reliable, thank goodness. Dusting off the snow, I headed out 11/15 to the hotel to change...and found out Yankees can't drive in the snow any better than us. Facing a several mile backup caused by construction and god knows what else (since there was a snow glaze on the road), I made a little side jog through the local country club. I'm also thankful for my GPS, although it's getting a little cranky.
Got out on the highway finally - along with all the trucks - headed north on 81. Beginning to wonder who names these little towns - Shartlesville, Upper Tulpehocken, Swatara, Lickdale, Linglestown...at least we name ours in the south after easily pronounceable names. At least I'd have a hard time tell AAA where I was...and I won't forget the pitstop at the truck stop - for god's sake, don't touch anything...but I finally made it to PA 61, where my GPS got totally confused by a revised interchange. No worries - the Cabela's store was clearly visibly from outer space.
You have to understand, we rednecks love our toys...heck, we build these great shrines to them. Bass Pro Shops - love em...Gander Mountain, always have some unique stuff...but Cabelas...
Somebody had us rednecks in mind while I was taking the winding driveway round to the mount, where the long driveway lead to a huge bronze statue at the front door - a trapper and indian in a canoe, a massive beacon that clearly shouts, "you can spend lots of money and be us...". after luckily finding a spot in the 50,000 space, 20 acre parking lot, I entered the facility...along with a thousand other rednecks of all breeds. What made it really funny was that we're all on redneck Christmas hunting safaris...and Cabela's didn't let me down. Pausing briefly at the t-shirt gallery (funny how they all beckon rednecks as souvenirs to say, I blew a grand here), I move to the camo section.
You have to understand - camo isn't clothing, it's a way of life. And you could have several of them here, half the main floor was covered with camo for all walks of life - heavy coats, pants, shoes, hats, gloves - and in the ladies section, "delicates" that screamed "you can't see me!" Moving across the aisle to the fishing section (and marveling at the thousands of lures with names like "baby cowbell" and "hunker lunker"), found a few interesting pieces of underwater art - and made my investment.
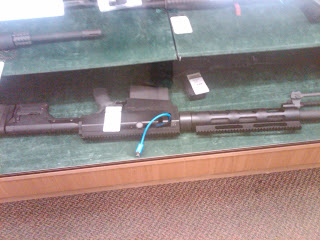 Wrapping up the wet side, I cruised over to the hunter's section. You never have to worry about our second amendment rights, 'cause they've got us covered. My favorite? Not just the camo guns (yes - even snow camo), but the 50 caliber assault rifle ( a steal at $5k) was drawing a crowd of oohs and aahs...put that one under the tree, we're goin' squirrel huntin'...along with every known brand and style of rifle, pistol and shotgun. But you have to visit the collector's section - guns from old times, wars, treated with a reverence and white glove saved for rare books and the constitution. Some of these were works of art, with all the scrollwork on the barrel and chamber. Don't plan on getting one of these without mortgaging the doublewide...
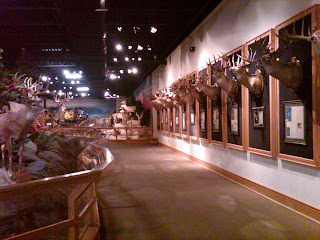 Speaking of museums, walked down a narrow hall behind the gun hall... and beheld the Deer museum. We're talking buck tributes to the greats - all mounts with a story to tell on each one. There's a reason why we all love to hunt deer so much. There's so much inbreeding, you get some of the wildest arrays of racks you've ever seen (a Bullwinkle rack....really?) After wandering through the museum, I felt like I should have left a salt lick or deer corn as an offering...but leave the doe urine out in the other hall, we don't want these boys coming back to life...
 And they even had a bargain barn - get your miscellaneous and useless stuff here, clothes, shows, etc. all piled up. But you had to move upstairs around the stuffed critter mountain in the middle of the store (all 4 stories of it) to get to the fun stuff - the redneck gift shop. That's where I found what prompted me to write this story...camouflage toilet seats. I ain't kiddin'...and not just one kind! Padded, wood grain, silent hinged (so you can sneak up on that terd before you drop in your hook and bait)...I was shaking quietly, as I didn't want anyone else to see me laughing. Along with other redneck gifts (ornaments of deers holding up the hunters they'd bagged, duck lamps, camo beanbags, couches, chairs, etc.) and even more serious redneck art - really, some sculptures and paintings had lots of zero's on the price...
Walking out through the restaurant and decided to decline the elk meat dinner, I decided I didn't have enough money to stay here much longer. I started the long trek across the half mile store to the checkout stand (no, I didn't buy the camo lighter or "who farted" camo hat). I bought my "souvenirs" and Christmas presents (even got one for the wife - she can't stand the stuff in these places, so I hope my choice isn't too misguided). I've learned a few things from my journey:
- Rednecks are keeping the economy running, as witnessed by the massive crowds;
- Yankees got rednecks, too;
- You really can get lost in a camo section and no one will find you;
- The story of the redneck defense league lives alive and well in the hunting section;
- There's some big daggum deer out there - and even if you take it illegally, it might wind up on a wall or display;
- My inner redneck is alive and well for me to travel 125 miles on a snowy evening to join all my redneck friends - but you won't catch me stocking up on $30 elk sausages and jerky anytime soon...it wouldn't fit in the luggage or make it through airport security...
Guess I'll have to drive up in my truck sometime and bring my clan..they'd have loved this place...BTW - here's the link for the store:
http://www.cabelas.com/stores/store_info.jsp?pageName=009
Have a merry Christmas - and don't forget to buy for the redneck you love! Next stop - the "Hap, Hap, Happiest place on Earth"!
David B.
Wednesday, December 15, 2010
News from IES Virtual Environment -
Got these updates in a post AU email from the folks at IES - I'm downloading these as we type...
The Future of LEED modeling is here...
This year we announced the launch of our exciting new LEED Energy modeling tool, the VE-Navigator for ASHRAE 90.1 (LEED Energy). Designed by experts in the field and already live project tested by users, it streamlines the calculation and submission process. Don’t be left behind, offer your clients more competitive offerings! If you work in this field you can’t afford not to check out the technical, commercial and time-saving benefits this tool provides. If you haven’t already, sign up for your free trial today by logging on to www.iesve.com/Software/VE-Pro/ASHRAE90-1. This product will be available to purchase from early December 2010.
Trelligence Collaboration Enables Unique Early Sustainable Analysis!
We were also excited to announce our partnership with Trelligence Affinity. Imagine a world where space programming and planning, can be integrated with schematic design and early sustainable analysis, all within one platform. Factors such as square footage, % glazing, layout, and orientation make surprising differences in the cost and energy efficiencies of a building – especially when they could all be easily tested in conjunction with one another – this is the future we envisage from the integration between our two software platforms!
For more information on our partnership and how it will benefit you, visit http://www.iesve.com/.
New VE-Gaia updates!
We hope you got the chance to check out our new VE-Gaia early stage analysis additions with double capabilities for architects at no extra cost!
VE-Gaia now provides in-depth sustainable analysis across the following:
• The Architecture 2030 Challenge
• Climate Interrogation/Bio-Climatic design
• Energy Use/Carbon Emissions
• Peak Building Loads
• Low/Zero Carbon Technology Feasibility
• Solar Shading/Daylight
• Natural Resources/Water
• Building Metrics/Materials Review
Want to know more? Contact us...
Contact enquiries@iesve.com call +1 617 426 1890 or visit www.iesve.com/NAmerica for further information. Or alternatively you can email one of our experts who were at AU directly:
Michelle Farrell: michelle.farrell@iesve.com
Kendra Milton: kendra.milton@iesve.com
Dimitri Contoyannis: dimitri.contoyannis@iesve.com
Give these folks a call!
later - David B.
Tuesday, December 14, 2010
Updates and Links
It's always good to stay on top of the blogs...
- Greg Arkin included a post about the new extension for Revit Architecture - Roombook - if you're on subscription, download and add this tool - this comes from Simon Gillis, read about the extension here:
http://thesustainabledesigntoolbox.typepad.com/blog/2010/12/revit-architecture-roombook-extension.html
- A very nice thread from William Spiers at Autodesk about file size for families - we were noticing recently that just because a family includes a lot of detail, it doesn't necessarily mean the file is getting that much bigger - and then I found this post on Family Jewels:
http://familyjewels.typepad.com/blog/2010/11/dont-judge-me-by-my-size-im-pretty-on-the-inside-smart-family-file-quote.html
Another note of families - we've created a custom template just for owner provided equipment, that goes with a spreadsheet we give the client. That way, they can fill out any pertinent data, then we turn around and add it back to our family. One item - make sure you create a custom subcategory for the geometry, even if you leave the family as a generic model - that way you have more visibility control over the family in the MEP model.
Also following up on a couple of items:
- checked out the new Energy Modeling Analysis extension for subscription - note that this is mainly an early SD tool for architects, and does not replace the more detailed analysis models engineers use such as VE Pro, Trace, etc. although the use and influence of Green Building Studio is obvious...
- Project Dasher, which was first widely discussed at AU, is the Autodesk attempt to link real-time building analysis data back to a Revit Model file - I'm keenly interested in trying this out, as we had a discussion about linking building controls back to the Revit model just a few weeks ago...can't wait to see how it works...see more at http://www.autodeskresearch.com/pages/dasher.
Last note - AU 2010 content files from my classes are available from Google docs - if you'd like to review a couple of sample templates I created earlier this year, send me an email or message and I'll send you the links. You need to have a Google account to download, so sign up first!
have a warm day!
David B.
Wednesday, December 8, 2010
Revit MEP for Water Treatment - Part 1
Now that I've had a few weeks to digest what we do and how we've been doing it, I've started to develop an approach to process jobs. Here's a few key things I've learned to get started:
1. Structure Leads! Since most water treatment plants are simple structures, getting the WWTP guys to produce the structure isn't that complicated, but it is essential. In this case, you can start with some prelims in Revit MEP (generic walls, levels, floor slabs and roofs, stairs and railing, openings and rooms) created at elevation - with the project base point at a specific corner of the building. I'm liking working at elevation but will be developing the model from the project origin - we'll worry about true NE points later.
2. Content - be prepared to develop your own! CADworks has got a nice little DI pipe library and is working on PVC, so I' recommend looking at their content
3. Don't expect the model to be a dead-on replica of the plant - the parts just aren't there yet. Expect to use a lot of generic solids and families, since most concrete structures are formed onsite. I've added an industrial equipment and WWTP family template to our library that contains the electrical/mechanical parameters someone might want when creating their connections.
I'm working on a new section for training that follows the WWTP process within a plant, and having the training material follow that process...should be interesting to see how it turns out.
Stay tuned....BIM for WWTP....
AU 2010 -- Wrap up!
So I thought I'd post a few pics here, and let you know the videos are being edited as we speak.
 |
| Lab Rats from ME419-1L - Fun Bunch! |
 |
The usual last class sunglass brigade - becoming a tradition, you don't want to leave AU without yours! |
 |
The next generation Tesla...I'm impressed.... |
 |
And last but not least...my new crew (sans Kurt - he was fashionably late to dinner) - From left, me, Norb (the boss!) Dave Fellows and Le-Thanh Nguyen - plus Kurt Ferrari, who arrived after the pic - we ARE the Gannett Fleming BIM Team! |
Thursday, December 2, 2010
Notes from AU - Days 2 and 3
I would have posted last night, but it was definitely a bear of day. AUv has some promise, but with technical glitches in all four classes yesterday, (including the wrong video playing in the first session), I understand the frustration. There were two areas Autodesk has got to get right:
- make sure whoever is running the stream starts the sessions on time, and doesn't cut the video off until the presentation is actually finished. If it's the technology there were using that did that, then get other technology. It was embarrassing to me on behalf of the attendees. Also, the lack of good, consistent, real time communication with the attendees (aka Goto Meeting), where I'm not having to restart moderator panels, constantly refresh would definitely make this a smoother event.
- do a better job of QA on their own work - there's no excuse for editing in the wrong video. All I could do was laugh, because I was too big to crawl under the table.
Don't get me wrong - I love the idea of Virtual training, but based on the comments I got, and the fact that I had absolutely no control or ability to fix the glitches, makes me want to personally apologize to those that had to sit through it.
Back to AU live - what keeps me coming back and wanting to present are the people that attend, It's very humbling to see the same people coming back year after year, and taking the time to sit in on my sessions, Yeah, they can get hokey (one person said to lose the gimmicks), but the idea is to separate what you do from other instructors - and 99% of the students get engaged and participate. I never wanted to be the teachers I had - boring, dry, and detached - those classes drove me nuts. This stuff is not the most entertaining stuff to listen to - add a deadpan, monotonic instructor, and you've got students sleeping their way through your class.
So, with this year's scores on the Revit MEP classes and my highest score ever on a lab, those will continue to be my main focus for AU 2011 (if they'll have me back). 6 virtual and 6 live was too much, but I like one student's suggestion to run a progression series - I like that, so maybe next year we'll run a process stack of sessions. Also, I do take to heart the idea of breaking up classes by discipline, although the classes have to have enough to register to get them to make, so that's a reason why having just electrical or just HVAC only in a class may not work.
Some great tips that came from the students and other instructors:
- create an area schedule that sets program area versus actual area - if you get over, the schedule reports it (I'd add a conditional format to the data to make it jump out).
- Same instructor also uses areas in Revit Architecture to define cube names and numbers, as opposed to using rooms for these parts of a building. They use the room to define the overall area or conditioned area, so the space in the MEP links to that instead of hundreds of cubicle spaces.
- If you need to export parameters from a family to a shared parameter, you can do this from the family editor - parameters tab - there's any export option I hadn't tried, but I'm going to.
Got several others I'm trying out - as I can get some to work, I'll get them posted here.
Long day, but good event - and I'm excited, because we're headed back to the Venetian next year - woo-hoo!
have a great evening - David B.
Wednesday, December 1, 2010
Posts from Vegas - AU 2010, Day 1
Well, it's not really day one for me, got here Saturday to do my virtual recordings. Eventful flight - before takeoff in Nashville, plane had to go back - cracked windshield...that's a problem you don't want to have at 38,000 feet.
Spent about 14 hours prepping for 3 hours of recordings. There are three AUv sessions that I had (for the first time this year) - one for AutoCAD Architecture, one for AutoCAD MEP and one for Revit MEP. Managed to hit Revit and ACAD A right on the time frame, but was a little short on ACAD MEP. Interesting note - these sessions are recorded in one take, so you have to a) own (not know) your material, and b) don't be afraid of mistakes - dwelling on them only points it out, so it's best to just keep moving. The hard part was watching final part - man, I gotta lose some weight...
Hats off to Autodesk and the AU staff - the speaker social was actually a great event, sponsored by Ford. There are awesome views from mIX at theHotel, took a few pics. Matt Dillon, good friend and mentor,got recognized for his years on contributions and classes at AU. I worked for him as a lab assistant at my first AU, and learned a lot from his style and rapport with the students. He's coined the perfect description of AU - "it's the running of the nerds..." - man, that cracked me up. As for the AEC mixer, watched the Autodesk Employee band - not too bad, but guys, "Comfortably Numb" is a party killer...
Had 5 classes total today - 2 virtual (of which the first one was cancelled - server issues - got to the Speaker Ready room at 6:45am, they said "didn't you get the email?" - had to laugh) and 3 live sessions, on Plant, Revit MEP and AutoCAD Architecture. And the Arch crowd was the best, followed closely by the RMEP group - but I got two more shots at that crowd on Thursday and Friday.
The exhibit hall is a great reflection of the current economic times. Met countless people that had changed jobs, left the channel for the design market, left Autodesk...but the real tell was how many fewer exhibitors there seemed to be. Not as many third party developers, and a much smaller crowd (looking like about 1/3 less) that AU 2008 at the Venetian. But the positive aspect was the determination of those present to take their current tools and process to the next level - they're all finally understanding that you have to stay on top of technology if you're going to survive as a business. Those that can't or don't evolve will be left behind...as well as those using outdated techniques and business practices.
Had a little dinner at House of Blues with a great house band, and got to finally meet some fellow bloggers in person. And for those that came to the classes - thank you so much for being there, and taking the time to attend my classes and participate - you're what makes doing this worthwhile!
So, that's the first report from the floor at AU 2010 - I'll try to do updates tomorrow and Thursday as well.
Happy modeling! David B.
Sunday, November 21, 2010
AU Virtual - Get ready for a whole new experience!
For the first time, I'm participating in AU Virtual, an online version of Autodesk University. Spent a little time cruising the site tonight - all I can say is, wow...the slick interface, dashboard, and ease of use blew me away...now if I can just get my classes to live up to the professional level of the site (ugh...none of my usual jokes will fly on this...)
 The lobby is slick on the level of detail - here's an early preview (umm, yes, I'm asking for permission - but I'm also promoting the site - ok?) - when you're ready to hit a class, join a chat or register, just pick a tool on the dashboard at the bottom of the screen. You can also navigate the lobby to visit keynotes, lounges, etc.
Only a week to go - see you in Vegas!
And have a happy Thanksgiving this week!

Only a week to go - see you in Vegas!
And have a happy Thanksgiving this week!
Friday, November 19, 2010
Plumbing fixture connections...who hates this?
Okay, I've heard enough - plumbers, and plumbing designers, ya'll are the crankiest people I've ever met. We know - you can draw a line faster, it's all figured out in the field, the program doesn't work, yada-yada...
So what does the plumber really need (besides a belt)? Rough in connections! He doesn't need connections on the bottom of a sink, or on the side of a urinal - all of that really does get worked out in the field...so how do you help these guys get into BIM?
There are two big things:
1 - Change the location of the connections to inside the wall (thank you Melania Sibley at Enfinity Engineering in Nashville, TN). She had a sink that was giving her fits - so we made a new family. All of the connectors sit 2" inside the wall. They are controlled by vertical and horizontal work planes - the water connections can be 4" or 8" apart, you pick - and the waste connection, centered, can be moved up and down vertically in the wall to the stub-out location. this maintains the system - and eliminates the need to draw out the p-trap, trap primer (call these out in a shared parameter for scheduling).
 2 - Check the fitting families - for annotation scale sizes, most fittings that show a tick have a "Tick Size" parameter - check the default, it's a formula - change the scale factor to something smaller if needed (i.e. 0.4 to 0.2) and see if it makes you symbols look better. Do the same thing with the ride drop symbol scale - and the drawings will look better! (BTW - I posted this tip earlier, but we still had people asking, so here's an image)

So what does the plumber really need (besides a belt)? Rough in connections! He doesn't need connections on the bottom of a sink, or on the side of a urinal - all of that really does get worked out in the field...so how do you help these guys get into BIM?
There are two big things:
1 - Change the location of the connections to inside the wall (thank you Melania Sibley at Enfinity Engineering in Nashville, TN). She had a sink that was giving her fits - so we made a new family. All of the connectors sit 2" inside the wall. They are controlled by vertical and horizontal work planes - the water connections can be 4" or 8" apart, you pick - and the waste connection, centered, can be moved up and down vertically in the wall to the stub-out location. this maintains the system - and eliminates the need to draw out the p-trap, trap primer (call these out in a shared parameter for scheduling).

You now have my permission to whip your plumbers into shape...and get them BIM'ing...
See you at AU!
David B.
Content, Content, who's got the content?
Okay, so I've been here a month, and one of the first tasks I've taken on is getting as much relevant Revit content as possible as it pertains to MEP and what we do...and man, it's been interesting. In my Revit MEP Tips class, I talk (briefly) about leveraging the Internet to go out and find what you need. I found a few things:
1 - Manufacturers for the most part are still lagging behind, especially in the industrial and process equipment sectors. Most of what I found was either a) overmodeled or b) non-existent. There are some manufacturers that are really ahead of the game - I've talked about them in the past (i.e. Victaulic, nicely done - Bell and Gossett - awesome, but got to consolidate a little).
There are two aggregators I want to give a shout out to - CADWorks, where my buddy Bernie Duncan (formerly with Autodesk) landed. He's got the piping library I need - so we're moving forward towards purchasing his product. He's also got a really nice library control front-end, so it'll be interesting to see how and if we implement this across the board. Check it out - http://www.cadworks.com/ - they'll have a booth at AU this year.
Another one that we used to sell (or tried to) is the SmartBIM library (http://www.smartbim.com/). Lots of good content, some of the more random pieces - I really like the space portion, where you can download whole rooms. I have hard time justifying paying an annual subscription for this unless they're actually helping us produce content that can't be found anywhere else - but they at least have the foundational pieces I'd be interested in using.
As always, you can find tons on Seek (seek.autodesk.com) but it needs to have its categories expanded. The quick look is a bit too generic, and the front end is starting to get dated. Better search capabilities and results would really be helpful.
2 - I went ahead and made a few families for our water treatment team as a way to prove concept (added a mud valve from scratch, used some ACAD MEP parts to temporarily get me a representative part for Revit, and made a UV Unit with just connection points and engineering parameters). Each one of these types required a different approach, so keeping it simple is the best practice.
We also created an industrial equipment family template. We use this to define owner provided equipment, where we need to see a model of their content, but the connection points may be a receptacle, a nozzle, or a drain that we engineer and provide. In this case, make sure the template includes what the load data, fluid requirements and air requirements are - and then create an equipment schedule to replace your spreadsheet. It's always good to have this in one place.
3 - Organization - if I can offer one good piece of advice - separate what you download and create from the out-of-the-box content. If you edit a OOTB part, then don't put it back in the default folder - put it in a custom folder. There's some debate whether you start a new folder completely separate from the default content, or create custom folders under the default content structure. What you don't want - if you're a full service firm - is duplicated content. Take the MEP items out of the architectural folder - have the architects use your content, so you can take advantage of the copy/monitor functionality for these fixtures. And I stay away from anything MEP that is wall, ceiling, floor, roof based - and even sometimes face-based. Any non-hosted object can still be constrained to another - for example, a non-hosted light to a ceiling grid - so I'm moving away from using any hosted that has to be shared or edited by others. The KISS axiom applies...
Next up - tackling process projects - and getting old dawgs to learn a few new tricks....see you at AU!
thanks - David B.
Thursday, October 28, 2010
First things first...Starting up the implementation...
Now that things have settled down a bit, it's time to start posting...the first things I've been working on since moving to Gannett Fleming is to get an understanding of where we are, compared to the industry. First thing - we're fortunate to have an executive team that believes in getting the most from technology, and making it work for the people in the firm. As we start looking at how to bring the team up to speed in BIM, I can't say enough about how valuable that support is. If the owners and executive believe, then it makes it easier for the team to believe.
One comment - I've heard from companies all over the company how about important moving to BIM is, but most firms only give it lip service. Building Information Modeling isn't just about drawing in 3D or adding data to parts - it's mainly about a process, an approach to how we design buildings, structures and systems. In order to be successful at BIM, you have to be willing to change your design process. The training we're working on emphasizes that concept. If you have an engineer that's fixed in the way they've been doing things for 25 years, we have to demonstrate how the BIM process benefits them - in earlier design decisions, in better visualization, and fewer field conflicts. It's all about doing a better job in design - not just making CAD better or faster.
Which is why it's so critical to train management and engineers at the same time - just training CAD and BIM users won't cut it if the pilot, the captain and the coach don't understand how the plane flies, the ship sails and the game is played.
Which brings me to the first thing I've found that will help. Autodesk seek has a document set called the
Autodesk Revit Model Content Style Guide (http://seek.autodesk.com/revit.htm). This document can help manufacturers and in-office content creators find common ground on items such as templates and parameter files. It's my first big tip of the game - read the docs first, and then work on creating your content. If the manufacturers are following this standard, then it makes it easier wen we develop our own content.
By getting to a common baseline, and making adjustments to how we read and produce data (such as what's added to schedules) we can make the incorporation of this data much easier to do.
Next up...new Revit Family tips and a sneak preview of AU...
later - David B.
Friday, October 15, 2010
Changes Happen...My Last Day at ASI!
After 13 years of selling, teaching, consulting, cajoling, convincing, listening and helping, I'm hanging up my shingle and leaving the reseller channel...but I'm not going away. I've taken a position as a BIM analyst with a large engineering firm based on the east coast, and will be helping them expand their presence in the southeast.
I'll still be teaching at AU, but more importantly, I'll finally have to chance to post observations and what I've learned from the other side of the fence. My intention is to become more active in regards to the training and consulting environment from the client's perspective, and hopefully continue to help Autodesk make their products the best on the market.
Thanks to Donnie and Paul for giving me my start, the folks at ASI for helping me to expand my world, and the best damn tech and sales team on the planet!
So stay tuned...there's a lot coming down the pipe real soon - see you at AU!
Wednesday, September 29, 2010
Updates and Advantage Packs
So there's been quite a few posts about the subscription advantage packs that Autodesk released:
- Use the AutoCAD Advantage Pack for AutoCAD, AutoCAD MEP, and AutoCAD Architecture
- Revit MEP, Revit Structure and Revit Architecture have their own packs
- don't forget about Navisworks, too...
Get all of these by logging into your subscription center - but be aware, thar's some biggums up thar..200-300mb...
Also posted are updates for Navisworks, Revit MEP, AutoCAD MEP, Revit Architecture and AutoCAD Architecture:
AutoCAD MEP 2011 Update 1
http://usa.autodesk.com/adsk/servlet/ps/dl/item?siteID=123112&id=15757045&linkID=9240938
AutoCAD Architecture 2011 Update 1
http://usa.autodesk.com/adsk/servlet/ps/dl/item?siteID=123112&id=15756945&linkID=9240658
The AutoCAD 2011 Update 1.1 is also included with both of the above updates.
For Navisworks Manage 2011 Update 1
http://usa.autodesk.com/adsk/servlet/ps/dl/item?siteID=123112&id=15689177&linkID=10382102
Revit MEP 2011 Update 2 is on the product download page:
http://usa.autodesk.com/adsk/servlet/item?siteID=123112&id=14973660
Revit Architecture 2011 Update 2
http://usa.autodesk.com/adsk/servlet/item?siteID=123112&id=14973244
Make sure you get these downloaded and loaded - and check the version to make sure you pick either 32 or 64 bit.
Start your downloads...
later - David B.
Tuesday, September 28, 2010
3 Helpful Posts on Inside the System for Revit MEP - Check them out!
An update to the Duct Fitting K-Factor Database:
http://inside-the-system.typepad.com/my_weblog/2010/09/update-revit-mep-error-invalid-duct-fitting-k-factor-database.html
Helpful tips for Connecting Circuits to a Panel:
http://inside-the-system.typepad.com/my_weblog/2010/09/connecting-to-a-panel.html
Controlling Workset Visibility in Revit 2011:
http://inside-the-system.typepad.com/my_weblog/2010/09/workset-visibility-in-revit-2011.html
All good stuff - check it out!
thanks - David B.
Thursday, September 23, 2010
Creating Plenum Spaces in Revit MEP 2011
While I was working on my classes, ran into this little undocumented feature. Autodesk added a new level type to 2011 (if they did in 2010, I never found it). When you want to create plenum spaces, you have to change the level to plenum - if you don't you won't see your spaces that you added - which, of course, I did about 20 times before I stopped and read the help file.
So, to do this correctly:
- Copy/Monitor your levels from the linked file - if the architect didn't add ceiling levels, you can add your own levels.
- Pick the ceiling level
- Go to the properties palette - change the type to Plenum
- Create a ceiling level view
- Add the spaces - make sure you change their energy analysis settings to plenum.
IES, Ecotect and Green Building all are a lot happier when you fill in the voids - so don't skip this step!
Later - David B.
IES Version 6.1.1 is available
Working on my AU class on energy analysis, and got an update from IES - they've release an update to version 6.1 - which I hadn't loaded yet...so go get it!
http://www.iesve.com/Support/Download-Centre
What's New in VE6.1.1?
Here's a summary of some of the major new features we've introduced in VE6.1.1.
ApacheHVAC Enhancements
We've added a whole host of enhancements to ApacheHVAC including improvement of modelling of DX cooling coils, air source heat pump multiplexing & sizing and fan data mapping for performance curves & auto-sizing.
Apache DHW Profile
Enhancements to Apache DHW (hot water) include optional operation on a separate profile to the
space occupancy and definition of incoming and supply water temperatures.
gbXML Import Enhancements
gbXML import from sources such as Autodesk Revit and Graphisoft ArchiCAD has been improved to give the most robust quality import yet.
To find out more and to read all about the great new features check out the New Features document and Release Notes.
Upgrading to VE6.1.1
It's easy to upgrade from previous versions to the latest one. If you have an active licence for VE6.1.0 or VE6.1.0.1 all you need to do to is visit our online Support Centre to upgrade to VE6.1.1.
If you have an active licence for versions earlier than VE6.1.0 head over to our online Download Centre to upgrade to VE6.1.1.
If you have any problems just drop an email to our team at support@iesve.com and we’ll help you get upgraded as quickly as we can.
Coming Soon!
We're working hard on our next major release which will be with you in the coming weeks. Watch this space for further details!
Man - I can't wait....see you at AU!
David B.
Thursday, September 9, 2010
The 100th Post - whew! Miscellaneous Ramblings...
So I finally hit a hundred...I'm not as prolific as some of my fellow bloggers (Greg, yer wearin' me out) but hopefully some of these have been helpful.
First things first - the Revit MEP 2011 Advanced training courseware will be available in a couple of weeks. Emy and I have finished the write up and revisions, and she's in proof mode now. Expect to start seeing some classes and the book available on our website soon. We've added a few new exercises, and included items on custom panel schedules, etc. that address new features. for more info, check out http://www.advsolinc.com/.
Second - AU is slammed this year, there are a ton of good speakers...I'm going to try to hop into a few, but this year will be my busiest - 6 live classes (including a two hour lab - the Revit analysis class is back!) and 6 AUv events (yes, it will be weird watching my own presentation on the web while answering questions in the background - can't wait to get in front of the green screen...). Here's the schedule (anything that ends with a V in the course number will be an AU Virtual class):
Tuesday – Nov. 30th
7:00am AB214-1V
Building Better in AutoCAD® Architecture 2011
7:00am - 8:00am
10:00am PD220-1
Taking a Quick Spin Through the Autodesk® Plant Design Suite
10:00am - 11:00am
11:30am ME223-2
Rockin' Hot Revit® MEP 2011 Tips
11:30am - 12:30pm
3:30pm AB231-2
Building Better in AutoCAD® Architecture 2011
3:30pm - 4:30pm
5:00pm AB234-5V
Building Better in AutoCAD® Architecture 2011
5:00pm - 6:00pm
Wednesday - December 1
7:00am ME314-1V
Rockin' Hot Revit® MEP 2011 Tips
7:00am - 8:00am
8:00am ME316-1V
Smokin' Hot AutoCAD® MEP 2011 Tips
8:00am - 9:00am
10:00am ME320-1V
Smokin' Hot AutoCAD® MEP 2011 Tips
10:00am - 11:00am
1:00pm ME326-1V
Rockin' Hot Revit® MEP 2011 Tips
1:00pm - 2:00pm
4:30pm ME333-1
Smokin' Hot AutoCAD® MEP 2011 Tips
4:30pm - 5:30pm
Thursday - December 2
9:30am ME419-1L
Maximizing Autodesk® Revit® MEP 2011 for Design Efficiency
9:30am - 12:00pm
This class will include a 30 minute break
1:30pm ME427-1
Lessons Learned from a BIM Coordination Consultant
1:30pm - 2:30pm
Some of these (i.e. Revit MEP and ACAD MEP) will fill up fast - sign up early! We had some pretty long lines last year - we try to cram as many in as we can, but you don't want to miss your chance for cheap sunglasses or mardi gras beads...
And last but not least - we're welcoming some new people to the ASI team on the technical staff:
Columbus Office - Genevieve Jerome MSD TE – Genevieve is a recent Youngstown State University Mechanical Engineering graduate and her most recent work experience Invacare Corporation where she worked with the seating and positioning team for the world leading manufacturer and distributor of manual and powered wheelchairs.
Cincinnati Office - Dan Fluegeman BSD TE – Dan is a Mechanical Design Engineer with training experience, and over twenty years experience in the Mechanical/HVAC Design field. Manufacturing design experience includes Architectural Building Products, Controls, and Residential Heating/Cooling products. Particular strengths in system layout and design, heating and cooling load calculation, and equipment selection. Dan has prior Autodesk reseller experience and will be a great asset to the team.
Louisville Office - Jeff Maffeo Technical Support –Jeff comes to Advanced Solutions with 5 years of Help Desk experience. Jeff’s passion for customer service and experience working in high volume call center will be a great asset to our technical support team.
Louisville Office - Kyle Daugherty Technical Support – Kyle comes to Advanced Solutions with over 10 years experience in the Architecture industry working with AutoCAD, AutoCAD Architecture, and Revit Architecture experience. Kyle will be focused on delivering best in class support to our BSD clients.
And we're still hiring - looking for some Plant3D consultants, so if you're interested, please don't email me directly (that won't help) but go to http://www.advsolinc.com/ and apply online - that will get you in touch with the right people.
Have a great day!
David B.
Friday, August 27, 2010
How do get the #$%#@$ Revit drawings to look right....Lineweights and Object Styles!
I'm an old school kind of guy - I started in the "chalk on a rock" days where we were putting ink on mylar. In those days, you had to know everything...before you put the pen to paper. AutoCAD, for how much I love it, made us a bit lazy, since we could make all kinds of changes quickly. Even getting the documents to look right has a couple of ways to do it (CTB vs STB, layer colors mean a specific penweight - ever get into a fist fight about this?).
Now Revit comes along a while back, and all of our MEP engineers are finally starting to move forward...albeit begrudgingly. One of their big gripes is that they want the same visual printed quality that they had using ACAD and the board. Out of the box, Revit has a bit of an unusual set of lineweight settings that I'm still not really sure where they came from (when was the last time you had a 1/2" lineweight), so I went back to my old penset (Kohinoor - remember them?). We used 4 penweight as industry standards - .25, .35, .50 and .70. When we got CAD, we got a little more sophisticated and started using .15, .18, .40 and .60 weights - because our old HP 7585 supported using 8 pens (woo-hoo! technology is so cool...).
So I had to make up a little chart that helped me understand what the conversion where between the old metric and my new best friend Revit MEP. So here's my table of penweights I used to satisfy all my old school engineering buddies (yes it's in spreadsheet form - send me an email and I'll send you the file):

Anything that's highlighted is pretty close to what we used to use as an industry standard. And I gave us a few more options, so the only thing to do now is go to your objects styles, and make the adjustments accordingly.
So if you still think Revit can't produce the same quality document that you're used to, all you need is a little knowledge - and a handy calculator...and a old school geek...
Later - David B.
The Z Man is online...with a new Blog!
One of my longtime co-workers, Michael Zeeveld, our technical engineer in Charlotte, NC has jumped into the blogging fray. He's posting tips and info about Revit, BIM and other architectural sundries. Check it out!
http://zeeveld.blogspot.com/
Later - David B.
http://zeeveld.blogspot.com/
Later - David B.
Wednesday, August 25, 2010
Two from Dave Kaldy - Revit Tips - Reduce File Size and Workset Visibilty
One of our technical Engineers, Dave Kaldy, came up with a couple of tech solutions I thought were worthy of the post...if you like these, send him an "attaboy" email to dkaldy@advsolinc.com.
Reducing Revit Central File Sizes
A lot of times we get calls from clients that are trying to reduce their Central file size. The typical response is to audit, purge , and then compact the file, and if that doesn’t bring the file size down, consider breaking the model into separate files. Here’s the new thing to try before breaking into separate files:
Open the Central file with the “detach from Central” box checked, and then save as a new Central file with a different file name, or to a different location on their server. What this does is it rewrites the database associated with the file and can dramatically reduce the file size.
For example I received a Central file today from one of our clients that was 117 mb. After I detached and saved it as a new Central file to my computer the file dropped to 64mb. I then did an audit, purge, and compacted the file and it dropped to 63 mb. This particular client had been making new local file every day, but they have not touched the Central file directly in about 6 months. Just something to keep in mind...
Workset Visibility in Views
There is a difference in how this works from 2010 and 2011. In 2010 when the Workset is first made there is a check box to make that Workset “Visible by default in all views”. If this box was not checked when the Workset was made then that Workset will not be visible by default in any new views made in the project, and you will have to change this visbility setting in the VV of each view. To fix this you will have to make a new Workset, check the “Visible by default in all views” box, and then move everything in the model from one Workset to this new Workset:

This issue was addressed in 2011. If you look at the Worksets dialogue in 2011 there is an additional column for “Visible in all views”. Worksets with this box checked will be viewable in new views (such as sections).

Kudos to Mr. Kaldy - thanks!!!
Happy BIM'ing - David B.
Tuesday, July 20, 2010
Updates for Revit 2011 are available...
Revit MEP 2011 Update #1:
http://usa.autodesk.com/adsk/servlet/item?siteID=123112&id=14973660
Revit Architecture 2011 Update #1:
http://usa.autodesk.com/adsk/servlet/item?siteID=123112&id=14973244
Download and install these when you get a minute - several fixes are included. These are not full versions, but install as service packs, so make sure your installation source is handy.
thanks - David B.
AU 2010 - Coming soon...
Here's a note from Joseph Wurcher - Registration for AU Las Vegas will open early September, Registration for AU Virtual and AU Extension will open on September 14. Get your internet access ready...those are going to be crazy dates!!!
And for the first time, there's going to be AU events in China (Nov. 16-17th) and Japan (Nov. 19th) - check out au.autodesk.com for more details.
Later - David B.
And for the first time, there's going to be AU events in China (Nov. 16-17th) and Japan (Nov. 19th) - check out au.autodesk.com for more details.
Later - David B.
Sunday, July 18, 2010
Tips o' the Day....Plant3D 2011!
Just installed the new Plant 3D 2011, looking forward to rifling through this the next few days...while reading the README (there's a novel thought), found a couple of things the users should know (this is not a complete list, so read the file for more detail)...
- Don't use the RECOVER command with Plant3D - use the command PLANTAUDIT instead.
- When tagging equipment, tags are case-sensitive - so p-100 would be read as a different pump than P-100...
- Line Designation Table configurations do not transfer from project to project...interesting....
- When you have multiple drawings open, and you create an iso from the drawing, you may get a fialure or incomplete drawing - so close and reopen if you're using xref's to generate iso views...I would expect a save beforehand should also help, but better to err on the safe side.
- Polyface meshes don't translate well to ortho drawings, so check the properties of your custom equipment - and avoid using them for the content, or convert to a plain mesh first.
- Flip grips on a pipe may cause the program to crash, so use the rotate grip instead.
- When creating a new project from an existing project, the first time you select the Layer and Color Settings node you may get an unhanded exception error...ignore it, the warning is an "undocumented feature".
- make sure you set the block units to Unitless before using it to create a custom part.
- And for the last one, when using Plant3D models in Navisworks Manage, make sure that the Navisworks Clash Detective is set to examine surfaces only, not lines...I wonder if the same is true for other ACAD platform based modeling apps (such as AutoCAD MEP).
Have a great evening - download your new version today!
Later - David B.
Friday, July 9, 2010
Navisworks Exporter for Revit 2011 Products
Since I've had a couple of people ask, to get the Navisworks Exporter for 2011, go to this link:
http://usa.autodesk.com/adsk/servlet/pc/item?id=13947462&siteID=123112
Fill out the form and then you can download the 2011 version that works with Navisworks 2011 and Revit 2011 releases.
thanks - David B.
http://usa.autodesk.com/adsk/servlet/pc/item?id=13947462&siteID=123112
Fill out the form and then you can download the 2011 version that works with Navisworks 2011 and Revit 2011 releases.
thanks - David B.
Tuesday, July 6, 2010
Man, I just can't get here enough...AU 2010 Update
Got a full load for AU this year:
SID: 2227
Title: Building Better in AutoCAD Architecture 2011
Type: Lecture
Length: 1-Hour
Expertise: Intermediate
SID: 776
Title: Building Better in AutoCAD Architecture 2011
Type: Virtual Class
Length: 1-Hour
Expertise: Intermediate
SID: 6343
Title: Rockin' Hot Revit MEP 2011 Tips
Type: Lecture
Length: 1-Hour
Expertise: All Levels
SID: 8094
Title: Smokin' Hot AutoCAD MEP 2011 Tips
Type: Virtual Class
Length: 1-Hour
Expertise: All Levels
SID: 5660
Title: Rockin' Hot Revit MEP 2011 Tips
Type: Virtual Class
Length: 1-Hour
Expertise: All Levels
SID: 7271
Title: Smokin' Hot AutoCAD MEP 2011 Tips
Type: Lecture
Length: 1-Hour
Expertise: All Levels
SID: 8312
Title: Lecture
Type: Lessons Learned from a BIM Coordination Consultant
Length: 1-Hour
Expertise: All Levels
SID: 1910
Title: Maximizing Revit MEP 2011 for Design Efficiency
Type: Hands-On Lab
Length: 2-Hour
Expertise: All Levels
SID: 7331
Title: Taking A Quick Spin Through the Autodesk Plant Design Suite
Type: Lecture
Length: 1-Hour
Expertise: All Levels
This will be my first time in front of the green screen for the virtual classes. I've been able to do this with some marketing presentations but not with a class, so it should a good learning experience...call me DB the "CAD Weatherman" (there's a little high pressure along the Revit front, along with storms chasing the Bentley crowd... a little snow on the AutoCAD line should make for a good Christmas...get it?).
Getting one on Plant3D was really nice - there's a lot of buzz around this product, and the way it leverages a variety of software across the Autodesk spectrum. Registation starts in late Auguest, so be prepared and sign up early - it should be an interesting show this year!
talk to you soon - David B.
Thursday, June 3, 2010
Starting Projects - Ecotect verses IES VE Pro
My first post on this topic is in regard to how projects get setup and defined by these two applications. You gotta start somewhere, so let's start with how these two applications approach this area.
Ecotect - after starting the program, the user selects a project tab. From this tab, they can input project information, including address, site location, terrain, etc. A nice touch is the incorporation of Google Maps (which also happens to be a site location option in Revit 2011):
 Once the project information has been input, the user goes to the data manager to set up project specifics - then the building conditions tool, then the model settings tool. While some of these settings can be predefined, having them scattered throughout several pulldowns and windows can make winding your way through these settings, and making sure everything is set as needed, a bit difficult.
For IES VE 6.0.6, the project is started by selecting New Project, then choosing a template that sets up a wide variety of project specific settings:

The templates can save the user a tremendous amount of setup time, covering building regulations, room conditions, the air system, internal gains and exchanges, as well as default analysis type data. The fact that the user is pointed to these specific settings at the very beginning, instead of having to dig through the program to find these setups, gives the startup leg to IES.
Next up - importing geometry and data into the project...
Tuesday, June 1, 2010
Ain't technology cool...
I'm flying on an airline (it'll go unnamed for now since the flight is packed and little rough)...flying at 32,000 feet...somewhere over Kansas at the moment, according to the pilot. And I'm updating my blog - who said technology ain't cool? Pretty fast internet connection considering...
So what in the technology world fascinates you?
Me, right now it's the building analysis software. I'm not a dyed-in-the-wool scientist, engineer, or researcher...but it's amazing to me what the design software packages will accomplish today. So here I am, cruising along, and gathering some thoughts...and now it's time to start talking in more detail about the main two applications I have an interest in - Ecotect and IES Virtual Environment.
At first glance, you would think that with Autodesk backing Ecotect up, it would have a distinct advantage in the marketplace, but right now both packages are just begining to head up that technology curve. But, IES has a much broader product base and is being more widely accepted, with a nicely designed add-in tool for Revit. So what is it that makes one package preferred over another?
First up - Ecotect Analysis 2010 (with Green Building Studio) - followed by IES Virtual Environment, with a new release set to work with the Autodesk 2011 product line....
Friday, May 14, 2010
IES VE Updates available for Revit 2011 Products
IES has released their version of the Revit Plug-in for VE. Here's the notification:
Offering performance analysis and BIM within the same platform, the IES VE plug-in to Autodesk Revit Architecture and MEP offers powerful functionality for sustainable building design.
We’re pleased to announce we’ve got a fresh new version of the plug-in for you! Revit 2011 users can now easily export models into any of our Virtual Environment (VE) environmental building performance analysis tools and undertake sustainable performance analysis. This new plug-in now supports Revit 2008, 2009, 2010 and 2011.
What does the plug-in offer?
The great thing about the plug-in is you don’t need to rebuild any models – a clever interface takes you through the ‘Setting Model Properties’ process step-by-step. All you need to have is basic information on building type, construction materials, and heating and cooling system types, at either the whole building or room level depending on what stage you are at in the design process.
Once you’ve set up your model you can access our performance analysis products by clicking the relevant button. Each product offers different levels of functionality; so whether you are an architect or an engineer, want top-level information or want to explore in much more detail, there is a solution for you.
Get your free copy of the plug-in today!
Simply visit http://www.iesve.com/Software/Model-Building/Revit-plug-in and click on ‘Download plug in’ to obtain your free copy.
For existing Virtual Environment VE Pro 6.0 users, download and install the hotfix 6.06 - this will update your version 6 software to support the 2011 products, as well as add some new features and improvements. Here's the link:
http://www.iesve.com/Support/Download-Centre/?aType=103&aSType=328
Go get 'em - the best analysis tool on the market is now even better.
Have a great weekend!
David B.
Thursday, May 13, 2010
Bummer...gotta take a cool stuff back - Surface Connectors are for Conduits!
Put in my "cool new stuff" post a while back for Revit MEP 2011 that pipe and duct can also be placed with a surface connector, similar to conduit...but I was WRONG...thus the bummer. When creating the conduit connector, look at the options bar, and you can pick between individual and surface connector...hey, this should be on the wish list...but I'm not complaining too much, just glad to have the conduit and cable tray.
BIM on, guys...
David B.
BIM on, guys...
David B.
Wednesday, May 12, 2010
Quick - can you tell me where this photo was taken - and when?
This is for the old school crowd - I took the picture, so I know the details, but am curious to see who else recognizes it... 

New BLOG - Family Jewels - Creating Quality BIM Content
Got Greg Arkin's daily blog update today, which included a link to a new blog, that includes some great authors, including Scott Brisk, Martin Schmidt and William Spier, among others - the first article I read was on creating BIM content, and hits the nail on the head - so I'm adding the link to my site as well.
Nicely done - here's the link:
http://familyjewels.typepad.com/blog/2010/04/the-watershed-event-that-birthed-the-family-jewels-blog-site.html
Thanks for the heads up, Greg - have a great day!
David B.
Nicely done - here's the link:
http://familyjewels.typepad.com/blog/2010/04/the-watershed-event-that-birthed-the-family-jewels-blog-site.html
Thanks for the heads up, Greg - have a great day!
David B.
Tuesday, May 11, 2010
Revit MEP 2011 Duct Routing Behavior - Undocumented Feature #1...
While working on exercises for the 2011 release of our fundamentals book, I ran across a neat little behavior...not sure if it was in 2010, but it's cool just the same.
Run an oval duct main out at an elevation, 16x12 is size, at about 12'. Leave the end hanging out in space. Run the air terminal command, and place the air terminal over the main - without selecting, watch for a duct centerline to be highlighted and an extension snap to appear (make sure you have this snap on). With the new properties dialog on, set the elevation for the air terminal at 8', and then place the terminal directly under the duct using the extension snap.
The branch to the air terminal will automatically connect into the main, complete with tap or take-off as specified by the main duct type. Try it out - it's really a time saver...and we'll have pictures of it in the book. This one may even make it to video...!!!!
Later - David B.
Wednesday, May 5, 2010
Slow Performance in ACAD MEP 2010 and 2011
After loading ACAD MEP 2011 on my new Win7 64 bit system, I noticed performance in ACAD MEP 2010 really slowed down dramatically. After checking a few posts, I ran a repair on my 2010 installation, which has fixed the problem. Other solutions beyond this (with reference to comments from Martin Schmid on the discussion groups) include recreating the user profile in Windows, if the repair doesn't improve it dramatically.
One other item I strongly recommend has to do with file maintenance. We've had a few firms experience problems with files that have xref's loaded, as well as issues when a server is swapped out. Anytime there's a new release, do one of these two things to improve performance
- open, audit and save all drawings on a project starting from base files (constructs if you're using Project Navigator) all the way up to your sheets. This helps make sure you don't have an older version base causing problems in an upper level view or sheet - which has happened regularly over the years). DWG convert only changes the release number, so I don't recommend using it - spend the time and do this right to avoid the issues later.
- if the file is still slow, start a new drawing from one of the out-of-the-box templates (you should update your templates with every release as well, by using one of these templates to create a new template, and copy your styles/layers, etc to this new template). Cut and paste all of the geometry from the old into the new drawing, and re-attach reference files from scratch. This full-service cleanup should help dramatically with file specific performance issues. And remember - work from the bottom up - from bases to sheets.
Here's a link to the thread on the MEP discussion groups -
http://discussion.autodesk.com/forums/thread.jspa?messageID=6373139?
thanks - David B.
Monday, April 12, 2010
Revit MEP 2011 - more cool stuff
Surface connectors - if you want to add a connector to a surface (for example, a conduit connection to a panel), use the surface connector - a dialog opens up along with a surface tool that allows you to use dimensions to locate the connection on a surface - and as soon as you add the connector, the pipe/conduit creation tool kicks in. It also works with duct, where you can use the surface locations to control how something that runs along a duct is placed.
Cable tray fittings have a new instance parameter that lets you change the radius of a curved fitting...nice....doesn't work yet with pipe/duct/conduit, but that would be a good wish list item....
Someone asked me in a support case if conduit will be able to be shown with true cut lengths - and my answer so far is yes...in both Revit MEP and AutoCAD MEP.
After seeing the MEP object copy monitor that allows you to map lights, air terminals, plumbing fixtures and mechanical equipment from an architectural mode to MEP specific types in your project, I'm impressed...and it lets you know that are any new fixtures that weren't previously copied or monitored.
With the new panel schedule templates, if you started a panel in a release prior to 2011, you can update these panels using one of the new panel templates - and you can customize panel schedules from the examples provided. The template options for the panels allows you to also set the size of the schedule itself, making page layout much easier. Load summary items can also be added and edited to the schedule as well, based on what types of power are used (i.e. lighting, receptacles, etc.) or you can show them all. Headers can be set to be horizontal or vertically oriented. Calculated values can be defined to add date for local/regional code requirements. Load classifications can also be created so the name matches the demand factor, and can easily be edited.
In the panel schedule, when balancing loads, if you don't want a circuit to move, you can lock it in place - and it shows up highlighted in the preview. Spares and Spaces can be added to a schedule, along with setting the default size for the circuit spares (i.e. 15, 20 amp). Rebalancing will not push loaded circuits into locked slots, whether it's assigned a load, or labeled as spare/space.
Armundo/Dave/Martin - you guys are my hero today!!! You've come to the product chasm, and leaped over it...I'm impressed!!!
More coming soon...
thanks - David B.
Saturday, April 10, 2010
Revit and AutoCAD 2011 Product Launches
Man...Greg Arkin beat me to the punch...I'm gettin' slow...
2011 products are going to be available for download April 16th. ATC sites and resellers can already download Arch and Struct products, but they'll all be available next week. Look for a 2.5-2.7gb download, so plan on doing it off-hours.
AutoCAD and AutoCAD-based vertical products such as AutoCAD Architecture and MEP are already available through your subscription center. Pay attention and make sure you grab the right OS version (32 vs. 64-bit). I also got a message that the AutoCAD MEP install failed when running it under Win 7 64-bit, but I think it was an error. AutoCAD MEP ships as an EXE and associated compressed .RAR file, which I think confused Win7. I just ignored the message, ran Setup.exe, chose Custom for my install type so I could add express tools, then ran the install - so far, so good.
Pay attention, and get ready...!!!
David B.
Friday, April 9, 2010
The Promise Fulfilled - Part 2 - AutoCAD MEP 2011
Man, how do you improve on this application - and where can you go with it? A lot of people have been asking this question, especially with the push towards BIM becoming that boulder rolling downhill. Toby Smith's AutoCAD MEP team has been hard at it with the 2011 release, and have come up with some neat new stuff.
Conduit - new to the program is a conduit routing preference, which behaves similar to the pipe routing preference - use it to set what fittings you want to use - so it's more flexible than it has been in the past. Placement settings are no longer a separate dialog, with Autodesk pushing the old dialogs out in favor of utilizing the properties palette to control size, bend angle, etc. There's also some improvements in routing with a parallel routing option, including concentric and fixed radius bends.
Piping - there is some new content for sanitary drain, waste, vent and sewer/storm drainage systems. To keep the flow direction working correctly in sloped pipe, the user can spec male and female ends as it related to flow - resulting in a more accurate representation of a drainage pipe layout. These were features that were added as an extension to 2010 and are now improved/incorporated into the main product. Tees are now accurately created when adding branches, and offset wyes now connect correctly to sloped pipe (including eccentric and concentric reducers). Some good tweaks here to make the program run smoother.
Overall updates include tweaking of justification of connecting geometry, such as duct or pipe) so that when a system is mirror, the justification is mirrored correctly - this helps keep the eccentric items maintain layout rules.
MvParts - In one of my recent classes, we attempted to replace some of the side view blocks in an MvPart to use a more detailed 2D block as what the user sees from that point of view - which didn't work, and in a response from support, had been taken out of 2010; it looks like the behavior is back in 2011, so the user can edit a side or symbol view block to allow for more detail...nice.
Rise drop symbols have also be improved, allowing a user to specify how a rise or drop symbol is displayed in the drawing; this works specifically for MvParts, endcaps, or fittings(including elbows, tees, and takeoffs).
Platform enhancements for the AutoCAD and AutoCAD Architecture that run under AutoCAD MEP include tools such as the Renovation mode. Released as an extension for 2010, and now incorporated, new/existing/demolition conditions are quickly identified. Existing objects within a single drawing automatically display as existing objects. When an object is deleted, it automatically changes its appearance, showing hidden lines to represent it as a demolished object. While in renovation mode, anything added to the drawing appears as a new object. For the folks doing as-built conditions and retrofit, this tool should help consolidate the tasks.
A couple of new tools have been added for walls - "intelligent" cleanup allows a user to grab a group of wall objects, then run the tool - the same rules apply as before (justification lines must touch, or cleanup radius extended, priorities still count, etc.) If you run this and still don't get the cleanup you want, the new Edit in Place feature allows you to draft what you want the conditions to be.
One of the big things I was hoping would implemented in this release was the constraints feature, which is more up-to-date method of using the anchor tools. Some (but not all) AEC objects can use a 2D constraint to align and lock objects together: for example, you can constrain a wall to a column grid line - if the grid line moves, the wall moves. I don't believe this works with MEP objects just yet, so let's see where this tool goes in the future - but it be really neat of we can constrain items like pipe runs to a wall or column grid line in the early design phases. Inferring constraints do not work with AEC objects as of this release, but who knows...
Column grid layout and numbering has been improved, as well as door/window/opening placement. You can use a column grid line with Dynamic Dimensions to locate openings in a wall - before you have to use wall ends and intersections.
The AutoCAD underneath includes several new 3D modeling enhancements, which should help users that are trying to create their own 3D solids representations for conversion into MvParts. Chamfer and Fillet commands are added, and existing tools such as extrude, loft and revolve are tweaked and improved. I also like the new transparent hatch feature, allowing a hatch to be a little see-through....kinky. Having grips on non-associative hatches is also very useful, allowing a user to use a grip to stretch, move, etc.
The drag and drop feature for materials that's been in AutoCAD Architecture is now passed down to platform ACAD - interesting they're treating this as a new feature, as we were doing this a few releases ago...I'll have to play around with that one to see what's really different about it.
Finally, the help system got an extreme home makeover, with web-based support being at the forefront - and be prepared to provide your serial number when dealing with either the reseller or Autodesk, as it's going to be required this year to get support help. they also added several videos that explain basic features, addressing the need of youger generation users that myself...but I still think are cool.
So, are we closer to fulfilling the promise of BIM? I've always believed that the AutoCAD Platform was more mature but is now hiding in the rock star shadow of Revit. It's sort of like one of my boys dating the older sister, then the younger sister...you get the idea. There's a lot of stuff here that still works better than Revit (anchors, connections through reference files, the detail component manager, etc.), and there's still areas where Autodesk could get it more like Revit and keep it moving (such as aligning interfaces - they still are not task and process related, which irks me). It's such a simple change that could really help put the user in control of the software, and learn it much more quickly. Oh well, I guess I'll have to keep creating process-based interfaces on my own...and make some money off of it...
OK, so this was a lot - I'd love to hear from some of you about what you really like, or maybe have found something that is an obscure change that wasn't documented (think of it as Autodesk's version of "where's waldo"). Send it up and I'll try it out - if it works, we'll post it right here, and you get all the credit...
Have a great weekend - David B.
Friday, March 26, 2010
Autodesk 2011 Products are Shipping!
And we're putting on a series of seminars, webcasts and hosted events about the new product line. First up is the Autodesk Sieze the Opportunity event. Scheduled for April 19th, 10:00am-5:00pm EDT, this is the "what's new" presentation that gives you the lowdown on what's been added to the programs.
Next up, Advanced Solutions will be hosted several events - and I'll be hosting our first Revit MEP event on April 20th, at 1:00pm EST. This event, which will be simulcast between most of our training centers, can also be viewed from the comfort of your own home through our online webcast. Since space and capacity are limited, sign up early - but don't worry if you don't make the first one...if it fills up, we've got another going on April 29th, May 5th...you get the picture. Sign up early and often - we'll be covering a little bit of the Revit MEP platform, then launching into new features in this information-packed event, which will go nearly two hours - so you'll be getting a lot out of it!
We'll also be hosted events on every other Autodesk product, with AutoCAD Architecture/MEP events being added later, but look for sessions on Navisworks, Revit Architecture/Structure, Ecotect Analysis and more - so go to our website and sign up today - http://www.advsolinc.com/, and follow the links on the main page!
See you soon!
David B.
The Promise Fulfilled - Part 1 - Revit MEP 2011
Okay, the first four years are always the fun ride...you never know what's gonna happen, and sometimes things don't always live up to your expectations. Working with Autodesk software has been like that - it takes a while for things to warm up and get going, as evidenced by the progression of applications like AutoCAD MEP.
So, in my earlier series of topics on the promise of BIM technology and the future, the 2011 release of Autodesk products brings us to the next phase...but are the programs fulfilling the promise of better, faster, more accurate, easier to use, etc? Let's start by taking a look at Revit MEP 2011.
First things first - the issue of conduit, cable tray and flat oval duct has been addressed by Autodesk. All of this items are defined by project specific type families, where fitting families can be added to a project, and used with a type. One nice feature I saw was how a conduit can be constrained to a cable tray - so if the cable tray moves, the conduit moves - very nice. No more using pipe and duct to respresent these objects, which will make coordination in Revit and Navisworks much clearer. So, this part of the promise is nearly complete - getting real world representations of objects into the hands of the Revit designer.
Second item up - panel schedules - these are customizable in Revit MEP 2011, which should stop some of the bickering about the look and feel of the documents. With the RDB Link add-in now part of the program, other database applications can be used to control the flow of data both ways - from an external table into Revit and back out again. There are also improvements to control items such as demand factors, so the designer can edit their behavior to get more accurate results.
Third item - a big one - is the "always on" properties palette, which allows instance property input during placement...very nice....although not everything is included, it's definitely a step in the right direction.
Fourth item - and the jury is still out on this one. Additional items have copy/monitor functionality such as light and plumbing fixtures, but I haven't seen anything on improving interoperability with an architect's ceiling grid element in a linked file - what I wanted was a horizontal constraint for a light referencing a linked grid. I didn't see this in the betas, but will check again when the shipping release comes out around the second week of April.
Fifth item - a new analysis display tool to show building analysis and space properties...haven't messed with this much yet, so as we get into updating our manuals, I'll try to get some additional information posted here.
So, how far does this go towards fullfilling the promise of a true BIM model? Well, it's not 100%, but it's not a baby step either. Just getting items 1-3 are enough to get me excited, especially since I've spent the past few months working as a BIM coordinator on a large medical project. I've heard all of the pros and cons, and am working up something for AU this year about the experience, but I'm even more convinced that Autodesk is going down the right path. Good job to Dave Pothier and the crew at Autodesk - I'm very pleased, and ready to move these guys forward...
Next up - The Promise Fulfilled - Part 2 AutoCAD MEP, and the new Promise - AutoCAD Plant3D...talk to you soon!
Later - David B.
Monday, February 22, 2010
The Promise - Fulfilled?
Stay tuned - new article coming in early March - get ready!!!!
thanks - David B.
thanks - David B.
Friday, February 5, 2010
AutoCAD P&ID Training - Are you Ready?
We are - we are now offering two courses for training on AutoCAD P&ID 2010 - a 2-day fundamentals course and a 2 day administrator course. Design for use in fluid engineering systems, this application gives the user the ability to build process and instrumentation diagrams quickly, while concurrently building a database inside of the project. And you don't have to have a SQL administrator to use it...if you're interested, call 877-438-2741, x1895 - we'll get you hooked up!
Later - David B.
Later - David B.
Wednesday, January 27, 2010
New Content Link - Lochinvar
Scott Brisk added a link to some new Revit MEP Content on his blog - so of course, I had to add one too:
http://www.lochinvar.com/products/documentation.aspx?mode=filetype&filetypeid=22
Got some nice boilers and water heaters up there - check it out?
Tell Scottie thanks -
Later - David B.
http://www.lochinvar.com/products/documentation.aspx?mode=filetype&filetypeid=22
Got some nice boilers and water heaters up there - check it out?
Tell Scottie thanks -
Later - David B.
Thursday, January 14, 2010
Project Structure and Following Process in the Revit Platform
Starting on a new project, I'm coming to realize just how important the structure of the project is, especially if the project is headed for a lifecycle management situation, or even something as simple as coordination.
My first observation is this - all disciplines, consultants, etc. need to set their worksets up exactly the same, from the architect down to the last specialty consultant for fire protection. For example, in a multi-story, mutli-quadrant building, each discipline should make each workset follow the following structure, in order:
- Shared Levels and Grids (default)
- Floor Level
- Level Spanning Building Elements
- Horizontal Work Areas
The first two are pretty easy to follow - even the architectural model should be broken up into level based worksets, to make visibility by level much easier to accomplish. If a wall, curtain wall, column, etc. spans more that one floor, then a workset of the spanning region should be used - and their could be more than just one spanning region of a building.
Horizontal work areas should especially be separated if part of a building is being renovated while another section is new. I'd even venture not to include a renovation area of the building in the same project, but on especially large jobs, breaking the renovation section out to another project, and using shared coordinates to line things up. Some of this passes back to earlier post I have made about the importance of elements being able to connect through linked files, or at least having some level of connection - that's my new favorite wish list item.
I would also consider breaking interior upfits out into a separate project on a core-shell type of job. With file sizes in Revit rapidly approaching breath-taking proportions, breaking up projects into logical horizontal areas just makes more sense.
MEP projects should also be approached the same way - break up objects by level, to make coordination easier. It creates a mess on a job if one department breaks a job up by level and another doesn't - each MEP related area should ALWAYS have identical level- and quadrant- based worksets, breaking down each discipline. Even sub-disciplines, such as low voltage communication, fire alarm, telecom and security systems should have their own level based worksets (and even separate projects in some cases).
WHY? Because when the time comes to build a project, if the Revit model is a deliverable, whether it's for coordinaton or life-cycle management, a well-organized and well-formed project structure makes these tasks much easier for both the contractors and owner. Architects and Engineers - make yourselves aware that the work you do in a BIM world is NOT the same thing as what you produced in the 2D CAD world. You have to think outside of the box, and work as though all players involved are in the same room, on the same team - you don't work in a vacuum. Communicating and following these methods saves all involved time and money.
And one last vent - use Revit correctly - don't skip steps!!! MEP Engineers, you have to create defined systems and circuits, especially in electrical. I could care less if you don't like the panel schedule - that's not the point of BIM. It's every bit as important as the tag you place on your old CAD files. By not placing lights and other power devices on logical circuits, you're forcing the electrical contractor to go back to the "chalk on a rock" method of referring back to paper docs to see how items are circuited - which is insane. Take the time to create panels, assign then distribution systems, and add your lights and other power receiving devices to a circuit. It's not a matter of whether or not the load is correctly being calculated - it's because that when BIM is required deliverable, the EC needs to know quickly what devices belong on what circuit quickly (by selecting or highlighting a device, and pressing the TAB key). This helps with the correct placement of junction and pull boxes, and the routing of conduit and cable tray.
Okay, I'm done - enough soapbox for one night...enjoy the weekend!
David B.
Subscribe to:
Posts (Atom)